


Search Your Query

All Cart

Cart

  • Home
  • How to Add IPTV to TiviMate on Firestick

How to Add IPTV to TiviMate on Firestick

images images
  • You can add IPTV to TiviMate in under 10 minutes using either an M3U link or Xtream Codes login.
  • Xtream Codes is the easier option because it auto-updates your channels and EPG (TV guide).
  • Most setup problems come from typing errors — always copy-paste your playlist URL instead of typing it.
  • Don’t have a playlist yet? A PackProTV free trial gives you a ready-to-use Xtream Codes login in minutes.

Got your IPTV login and ready to actually watch something? Here’s exactly how to add IPTV to TiviMate on your Firestick, step by step.

If you’ve made it this far, you probably already installed TiviMate and you’re staring at an empty home screen. That’s normal. TiviMate doesn’t come with channels built in — you have to load your own playlist.

The good news? This is the easiest part of the whole IPTV setup. You’ll be watching live TV in the next few minutes.

What You Need Before Starting

Before you add your playlist, grab these three things. Having them ready makes this a two-minute job instead of a ten-minute headache.

  • TiviMate installed on your Firestick or Fire TV.
  • Your IPTV login info — either an M3U URL or an Xtream Codes username, password, and server URL.

Featured Solution

12 MONTHS SUBSCRIPTION - IPTV

  • A stable Wi-Fi connection. Buffering during setup usually means a weak signal, not a broken playlist.

M3U vs Xtream Codes: What’s the Difference?

You’ll usually get one of these two login types from your IPTV provider.

  • M3U URL — a single link that contains your whole channel list. Simple, but it won’t auto-refresh unless your provider updates the link.
  • Xtream Codes — a username, password, and server address. This is the modern standard because it pulls live updates, EPG data, and catch-up TV automatically.

If your provider gives you a choice, go with Xtream Codes. It just works better long term.

image 14 at packprotv store

Step-by-Step: Adding Your Playlist to TiviMate

Here’s the exact path to follow inside the TiviMate app.

  1. Open TiviMate on your Firestick home screen.
  2. On the welcome screen, select “Add Playlist.” If you already have one playlist loaded and want to add another, go to Settings > Playlists > Add Playlist instead.
  3. Choose your playlist type: “M3U Playlist” or “Xtream Codes login.”
  4. Enter your details:
    • For M3U: paste your playlist URL into the field.
    • For Xtream Codes: enter your server URL, username, and password exactly as given.
  5. Give the playlist a name you’ll recognize, like “My IPTV.”
  6. Select “Add” and let TiviMate load your channel list. This can take 30–90 seconds depending on how many channels you have.
  7. Once it finishes, hit “Continue” or “Done” to land on your new channel guide.
image 13 at packprotv store

Adding Your TV Guide (EPG)

If your channels loaded but you’re not seeing show times and descriptions, you need to add your EPG source.

  1. Go to Settings > Playlists, then select your playlist.
  2. Tap “EPG” and choose “Add EPG source.”
  3. If you’re on Xtream Codes, TiviMate usually pulls this automatically — you may not need to do anything.
  4. For M3U users, paste the EPG URL your provider gave you (it often looks like a link ending in .xml or .xml.gz).
  5. Save, then back out to your channel list. Give it a minute to populate.

Best Settings & Troubleshooting

A few quick tweaks make a big difference in how smooth your streams look and feel.

Recommended settings to check:

  • Settings > Playback — turn on hardware decoding for smoother 4K playback.
  • Settings > Interface — switch to “Grid” or “List” view, whichever feels easier to scroll.
  • Settings > Parental Control — set a PIN if kids use the same Firestick.

Common problems and quick fixes:

  • Channels won’t load or show “0 channels”: double-check your playlist URL for typos. Copy-paste it instead of typing it manually.
  • Buffering or freezing: restart your router, or switch your Firestick closer to the Wi-Fi router. A wired Ethernet adapter for Firestick also helps a lot.
  • No TV guide info: your EPG link may be missing or wrong. Re-check step 4 above under EPG setup.
  • Playlist worked yesterday, not today: some free or low-quality IPTV links expire or get overloaded. A stable provider avoids this problem entirely.

If your playlist keeps failing no matter what you try, the issue usually isn’t TiviMate — it’s the playlist source itself. This is exactly why a lot of people switch to a dependable service instead of piecing together free links. A PackProTV free trial gives you a working Xtream Codes login you can drop straight into TiviMate, so you can rule out the playlist as the problem in under five minutes.
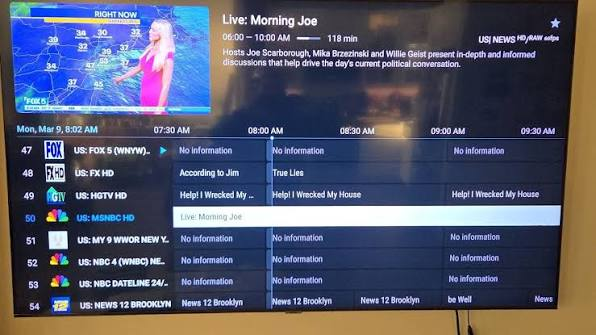
image 15 at packprotv store

Frequently Asked Questions

Do I need to add my playlist every time I restart my Firestick? No. Once you add it, TiviMate saves your playlist and EPG settings. You’ll only need to redo this if you clear the app’s data or get a new device.

Can I add more than one playlist to TiviMate? Yes. Go to Settings > Playlists > Add Playlist to load a second one. TiviMate can merge multiple sources into one guide.

Why are some channels missing after I added my playlist? This usually means your provider’s playlist doesn’t include those channels, or the list hasn’t fully refreshed yet. Try Settings > Playlists > your playlist > “Force Update.”

Is Xtream Codes safer or better than M3U? Neither is inherently safer — that depends on your provider. Xtream Codes is just more convenient since it auto-updates channels and EPG data for you.

What if I don’t have a playlist yet? No problem. You can grab a PackProTV free trial to get a working login and test everything out before committing to a plan.

Featured Solution

Free Trial - IPTV

Once your playlist and EPG are loaded, TiviMate does the rest — smooth channel switching, a real TV guide, and DVR-style features if your provider supports them. Getting IPTV added to TiviMate correctly the first time saves you from re-doing setup later, so take the extra minute to double-check your login details before moving on.

Leave a Reply